This page describes my software (written in C, Perl and bash script) which allows the removal of the vignetting from raw photos made with wide angle lenses (such as Sigma 10-20mm lens), with an optional neutral density filter (like B+W ND110). In the latter case, the variable color tint is also removed. The software can process multiple images (with or without filter) into one corrected HDR image.
Highlights:
Hugin. I also include a script for calibrating other lenses. Soon I will add calibration files for my other lenses (Canon EF 50mm F1.8, Canon EFS 18-55mm, Sigma 55-200mm).
hot.sh (to find your camera's hot pixels from a few dark
shots), raw_convert.sh (uses the hot pixels' list to do clean RAW->TIFF or JPG batch conversion), tint.sh
(matches the tint of the second image with that of the first one - useful for simple filter tint correction when no calibration
was done).
The software is provided as is; under no circumstances the author shall be found responsible for any damage resulting from the use of this software.
Examples
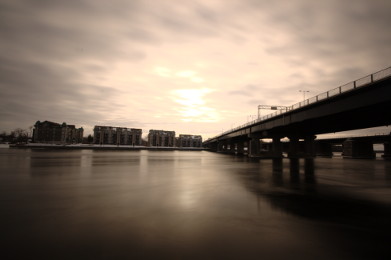
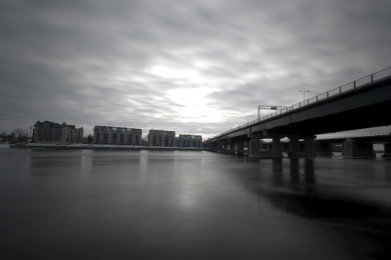
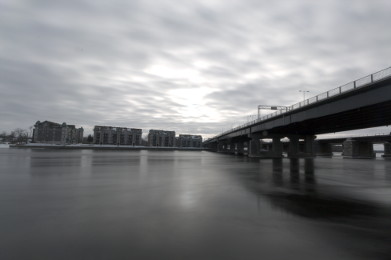
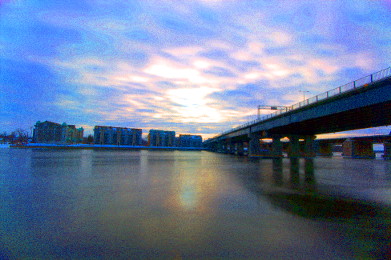
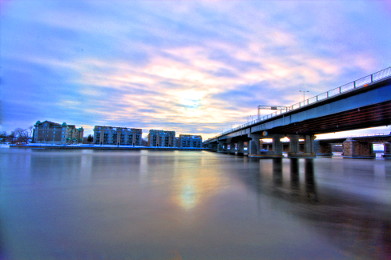
If you are a photo-hobbyist, you probably love wide-angle long exposure pictures like these:
![]()
These photos were made with the neutral density filter ND110, usually with wide-angle lenses. Of course, you immediately see the problems with these photos:
Fortunately, all these defects can be fixed via software. Let's consider one example. I took a few long-exposure daytime photos of Galipeault bridge in Montreal with the Sigma 10-20mm lens and ND110 filter. Here are the photos made without the filter (left) and with the filter (middle):
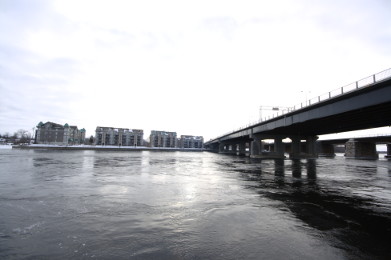

Even without the filter the Sigma's vignetting at f=10mm is rather bad; with the filter it's much worse, and you get this terrible purplish tint. It's even hard to tell this is a color photo! Applying an auto white balance (right photo above) does not do any good, as the color tint is unnatural and cannot be fixed by changing the color temperature.
I decided to write software which would allow me to calibrate and fix these problems. As the first step, the software removes the global color tint (left photo):
As you can see, the tint is gone, but the strong vignetting is still there. (Tech info: I remove the tint at the RAW->TIFF conversion stage, before demosaicing; this ensures minimum color artifacts.) Next, I apply my de-vignetting code which was calibrated with this lens and the filter, at the specific values of the zoom (10mm) and aperture (the middle image above; de-vignetting is done separately for red, green, and blue colors). Now the photo looks the way it should - no vignetting, no tint.
Unfortunately, this is not a good result yet. The photo I obtained is much noisier near the edges than at the center. (You can see this effect amplified in the right photo above, where I dramatically increased the color saturation of the middle photo.) It is easy to understand why: in the original photo, the edges were much (almost 8 times) darker than the center, so it is not possible to find an exposure which would work well for both center and the edges: either the center will be well exposed, but the edges will be noisy (like in my example), or the center will be over-exposed, with well exposed edges.
To address this issue, one has to resort to HDR (high dynamic range) photography. To do that, you have to make a few shots in a row (with the filter on) with exposures both lower and higher than the normal exposure. (Camera has to be rigidly fixed using a tripod.) My software can process such a sequence of photos into one tint and vignetting corrected photo. Here's the tonemapped result (with normal and increased saturation):

(Click on the left image to see the full resolution version of it.) As you can see, the noise at the edges is practically gone. (It would be even better if I used more exposures; in the above example I used 4 photos with 1, 6, 19, and 160 seconds exposures.) (Tech info: in my software, I first remove the global tint, then merge all the photos into one HDR photo, and only then apply de-vignetting separately for the three colors. This produces an HDR photo with the least amount of noise.)
Even if you don't use dense ND filters (like ND110), you may still find the amount of vignetting produced by wide-angle lenses (like Sigma 10-20mm) unacceptable. This is especially relevant for low contrast scenes (like snowy plane). Let's condider the second example:
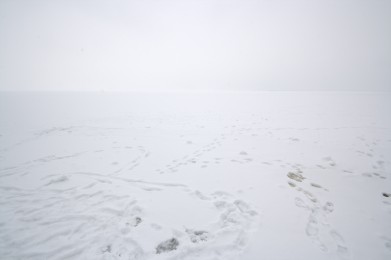
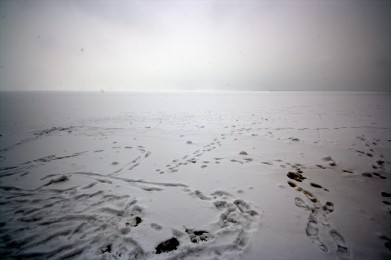
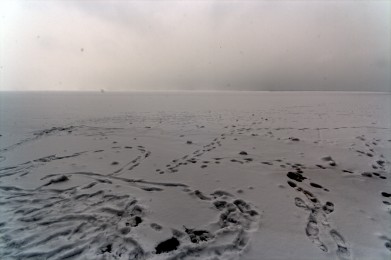
On the left, you see the original image, made with the Sigma 10-20mm lens with f=10mm and the f/18 aperture. (For such small aperture, vignetting should be the least noticeable; for f/4 it would be even more pronounced.) When I used the "auto-contrast" feature of my image editor (the middle image), vignetting became very dramatic, resulting in a non-acceptable quality of the image.
On the right, I show the image processed with my software (the command was devign.sh 0 0 image.CR2), with
the auto-contrast applied. You can see that vignetting is gone, resulting in a nice quality image.
Software
My software works only under Linux, or under Windows with Cygwin. If you don't know anything about Linux and/or Cygwin, you probably shouldn't try to use it. In either case, you will need the following packages before installing my software:
tar -xvzf Image-ExifTool-8.03.tar.gz
cd Image-ExifTool-8.03
perl Makefile.PL
make install
ca_calibrate.sh and ca_remove.sh. Binaries are available for both Linux and WIndows. (Install the Windows binary version if using Cygwin under Windows.)
If you have all of the above, then you can download the archive with my software,
and unpack it:
tar xvzf vignette.tgz
You will also need to download the source files for Pfstools. After you untar it in your home directory, copy my modified version of the program pfsgamma to the pfstools source directory, and then compile the tools:
\cp ~/Vignette/pfsgamma.cpp ~/pfstools-1.8.1/src/filter/
./configure --disable-static --disable-imagemagick  --disable-openexr --disable-qt --disable-jpeghdr  --disable-octave  --disable-opengl --disable-matlab --disable-gda
make install
(Under Linux, if you cannot compile with the default, gcc4 compilers, install the older, gcc3/g++3/g77 compilers, and add the corresponding CC, CXX, F77 switches at the end of the configure command; e.g., on Fedora 11, install compat-gcc34\* packages, and add "CXX=g++34 CC=gcc34 F77=g77".)
Then you can compile and install my software:
cd ~/Vignette
./install.sh
It is very advisable to edit the initially empty file deadpixels.txt, by putting there a list of your camera's hot pixels. This step will make your photos much cleaner, and will be helpful for the photo processing. You should put one pixel per line, the format is "x y 0",
where x and y are the pixel coordinates. You can use my script hot.sh (included) to
automatically generate the deadpixels.txt file. Just take two-three long (1-2 minutes with ISO 100; no dark frame subtraction in the camera) dark shots, and then run the script as
hot.sh Nsigma raw_dark_image1 raw_dark_image2 [ raw_dark_image3 ... ]
where Nsigma is the number of standard deviations. (Should be larger than 6; I use 10.)
The main script is
devign.sh- run it without arguments to see all the options. Here are the typical examples:
devign.sh 0 0 IMG_001.CR2 IMG_002.CR2 IM_003.CR2
This will produce corrected images IMG_001c.tif, IMG_002c.tif and IMG_003c.tif (16bit color; linear sRGB).
devign.sh 0 2 IMG_001.CR2 IMG_002.CR2 IM_003.CR2
The result will be in IMG_003c.tif.
devign.sh 1 0 IMG_001.CR2 IMG_002.CR2
devign.sh IMG_004.CR2 2 IMG_001.CR2 IMG_002.CR2 IM_003.CR2
In the above example, make sure that both IMG_004.CR2 and IMG_001.CR2 are well exposed (not over or under-exposed). The script will print the tint correction coefficients (RG and RB), which can be inserted into the devign.sh script - either as a new value of the "Mode", or by replacing my "Daylight" etc. values. (This will probably be required if your camera is not Canon 1000D.)
ca_remove.sh, with the calibration files for Sigma 10-20mm f4.0 lens. (More lenses will be added later, or you can do your own calibration, using the ca_calibrate.sh script - see below.) It can be used either with raw images (directly from your camera), or with 16-bit TIFF files with Exif information (e.g., output of my other scripts - devign.sh, raw_convert.sh etc.) Examples:
ca_remove.sh *.CR2
ca_remove.sh image1.CR2 image2.tif image3.TIFF
The output images are linear sRGB 16-bit tiff files, with the letter "a" added at the end of the image name.
calibrate.sh *.CR2to process all the CR2 files in the given directory. The script is smart enough to sort out photos made with and the without filter (but only if you use only one filter - don't mix shots made with different filters - the software has no way of detecting that!), and with different lenses (the order of photos is not important). All the "no-filter / filter" pairs of photos will be processed together to make full calibration files; if there is no pair, it is assumed to be a "no-filter" image. At the end, the calibration files will be copied into the standard location, used by devign.sh. You can test everything by running
devign.sh 0 0 *.CR2- it should generate no warning about mismatched F number or focal distance, and produce nice flat (de-vignetted) tif files.
cd ~/Vignette/DAT
tar cvzf archive.tgz Your_lens_model
(replace Your_lens_model with the actual name of the directory), and send the file archive.tgz
to me (you can find my email
at the bottom of this page). This will be really appreciated!
Now I also include the chromatic aberration calibration script, ca_calibrate.sh, which is using the program
tca_correct from the Hugin package. You can use it to calibrate chromatic aberration corrections for other lenses. Here is the procedure:
ca_calibrate.sh *.CR2
to process all the CR2 images in the current directory.
tca_correct settings I put in the script are for the best possible quality, but super-slow (30min per image -
so it can take days to process all your images). If it is unacceptable, and you are okay with a lower quality, change the
arguments to the -g and -n settings in ca_calibrate.sh to lower values (I use 50 for both).
~/Vignette/DAT1, and are immediately
available for use with ca_remove.sh.
Here is a short description of my algorithm.
At the calibration stage, flat-field image is analysed by my C program vignette. It averages the pixel brigntess
in 250 concentric rings centered at the image center. I average the three colors (R, G, B) separately within
each ring. This is done in the linear space (where pixel
value is proportional to the object brightness). The program writes out a file, vignette.dat, which containts a table of the ring radii
and the corresponding average R, G, B pixel values.
Next, my program vign_fit reads the file vignette.dat, converts all the pixel brightness values to
natural logarithms, and then fits polynoms of the seventh power of ring radius separately to the logarithms of R, G, and B brightness
(using the least squares approach), and also for the average of the three colors (this will be used for "grey" de-vignetting - for
the shots made without the filter). The computed polynomial coefficients are written to the file vign_params.dat, which is
then copied to the standard location for the calibration files (~/Vignette/DAT/lens_model/focal_distance/F_number).
When you run devign.sh, the script fixes the global color tint, then finds the appropriate calibration file,
and my C code vign_fix uses the polynomial coefficients to fix the vignetting (by dividing each image pixel value by the polynom
value for this paricular radius; it is done separately for R, G, B colors if the Filter value is larger than zero).