Here is a typical situation for a photo-hobbyist with an SLR camera: you want to make a portrait of a person (with the depth of field, or DOF, deep enough for the whole subject being in focus), and want to achieve as strong bokeh effect (blurred background) as possible. If you only have one lens, this can be quite straightforward - e.g. simply use the online DOF calculator, and after a few tries and errors you can arrive at the optimal aperture to achieve your goal.
Things get much more complicated if you have a few lenses, especially if some of them are zoom lenses. It is not obvious at all which of the lenses, zoom and aperture values will produce both sharp foreground and the most blurred background - especially if the background is not very far away (e.g., when taking photos inside the house).
Also, you may wonder if a certain lens (which you don't have, but are thinking of buying) can produce much stronger bokeh under specific circumstances (e.g., a full-body portrait on the street) than any of your current lenses, and so if it's worth spending money on.
So I ended up writing a simple C code which does all the computations for you, for the whole collection of your lenses (plus any potentially yours lenses), and prints out the lenses/aperture combinations which produce the best bokeh (but still keep the foreground in focus, within the specified DOF). All the equations were taken from the wikipedia pages on DOF and bokeh. I used the exact equations, which should be valid for both close-up (macro) and long-distance shots. To get the solution, I did some simple math (basically, solved a quadratic equation.)
The binaries are available for Windows
and Linux. This is a command-line program - so you have to run it from a command-line shell ("DOS shell"
under Windows). Before you run it, you have to create a text file lenses.txt
containing the important data for all the lenses.
The file format is as follows:
Crop_factor_of_your_camera
Name_of_lens1 Focal_distance_in_mm Fmin Fmax
Name_of_lens2 Focal_distance_in_mm Fmin Fmax
...
Here Fmin and Fmax are the minimum and maximum apertures for the given lens. If it is a zoom
lens, you have to create separate lines for a few different values of the focal distance, with the corresponding Fmin
and Fmax values. As an example, you can use my lenses.txt file.
Run the code without arguments to see the explanation for all the three required command-line arguments:
Usage: bokeh L DOF_min S

Here
  L:       The height of the snapshot at the object's distance (m);
  DOF_min: Minimum depth of field required (m) (can be zero if DOF is not important);
  S:       The distance between the object and the background (set to a negative number if the background is in the infinity).
So, for example, if you want to make a head shot, choose
L=0.3m, DOF_min something like 0.2m, and the
actual S value (will be 1-5 m in the house, 2m-infinity
outdoors; use "-1" for infinity - remote street lights, stars
etc.). For an upper body portrait, use L=0.6m, and for a
full-body portrait - L=2m (the numbers are approximate;
you can choose any other values).
The program prints out a list of your lenses, which is sorted out according to the
strength of bokeh (c - the last parameter in the table), with the strongest
bokeh cases at the top of the list. The table also lists the corresponding focal distances,
f, the distance from the lens to the object d (in meters), the required
aperture value F, and the size of bokeh c measured in "largest confusion circle" units
(equal to 0.03mm for a full-frame camera) used in DOF computations. When c is less than one,
there is no bokeh effect (the background is completely sharp); bokeh becomes obvious at c=10 and
is huge when c is larger than 100.
You'll probably be surprised to see some of the results: quite often, you'll get better or comparable bokeh with cheaper (not super-fast and accordingly super-expensive) lenses. Here are specific examples, based on all my lenses + a few fast lenses I don't own:
bokeh 0.3 0.2 3

    Lenses sorted according to bokeh
  Name           f(mm)    d(m)   F       c

 Sigma_55-200mm   200     4.20  12.7    17.51
   Carsen_135mm   135     2.83  12.7    14.59
 Sigma_55-200mm   134     2.81  12.7    14.54
 Sigma_55-200mm   102     2.14  12.7    12.52
      _85mm_1.8    85     1.79  12.7    11.23
 Sigma_55-200mm    67     1.41  12.6     9.63
  Canon_18_55mm    55     1.16  12.6     8.40
 Sigma_55-200mm    55     1.16  12.6     8.40
      _55mm_1.4    55     1.16  12.6     8.40
     Canon_50mm    50     1.05  12.6     7.85
As you can see, my cheap telephoto Sigma lens (and cheap manual focus 135mm f2.8 lens) do a better job here than much more expensive ones - like 85mm f1.8 or 55mm 1.4 - as long as you have enough of room in the house for the shot (you have to be 4.2m away with the Sigma lens, and 2.8m away with the 135mm lens). The bokeh is quite pronounced (c=17.5). Note also that the aperture has to be quite small - F=12.7 - to achieve the required DOF of 20cm.
bokeh 0.6 0.2 5

    Lenses sorted according to bokeh
  Name           f(mm)    d(m)   F       c

   Carsen_135mm   135     5.54   3.3    26.28
      _85mm_1.8    85     3.49   3.2    20.55
 Sigma_55-200mm   200     8.20   5.7    17.72
 Sigma_55-200mm   134     5.49   5.0    17.03
 Sigma_55-200mm   102     4.18   4.6    16.10
      _55mm_1.4    55     2.25   3.2    15.57
     Canon_50mm    50     2.05   3.2    14.57
 Sigma_55-200mm    67     2.75   4.0    14.41
 Sigma_55-200mm    55     2.25   4.0    12.63
Now my cheap 135mm lens (paid 30$ on ebay) shines, and is substantially better than the rest of the crowd (including the expensive lenses) - as long as it's okay to stand 5.5m away from the subject. The aperture has to be slightly smaller than the wide-open value of 2.8. The bokeh is 50% stronger than in the previous (indoors head shot) example.
bokeh 2 0.2 -1

    Lenses sorted according to bokeh
  Name           f(mm)    d(m)   F       c

   Carsen_135mm   135    18.14   2.8    19.29
      _85mm_1.8    85    11.42   1.8    18.89
      _55mm_1.4    55     7.39   1.4    15.71
 Sigma_55-200mm   200    26.87   5.7    14.03
     Canon_50mm    50     6.72   1.8    11.11
 Sigma_55-200mm   134    18.00   5.0    10.72
 Sigma_55-200mm   102    13.70   4.6     8.87
 Sigma_55-200mm    67     9.00   4.0     6.70
 Sigma_55-200mm    55     7.39   4.0     5.50
So here again, the cheapest (135mm) lens wins over, with a relatively strong bokeh (c=19.3). The distance from the subject is substantial - 18m. The lens has to be wide open (F=2.8).
I wrote a new C code - "bokplot.c" - which (together with a free program "Gnuplot") can be used to visualize the results of my code "bokeh". Here are the binaries for Windows and Linux. When you run the program, you provide only one parameter - the required DOF (say, 0.2m):
bokplot 0.2
(this produces a few *.dat files; the file lenses.txt has to be present in the same folder), and then visualize the output by running Gnuplot (binaries are available for Linux, native Windows, and Cygwin under Windows) in the same folder:
gnuplot bokplot.gnu
(My gnuplot script bokplot.gnu has to be present in the same folder.).
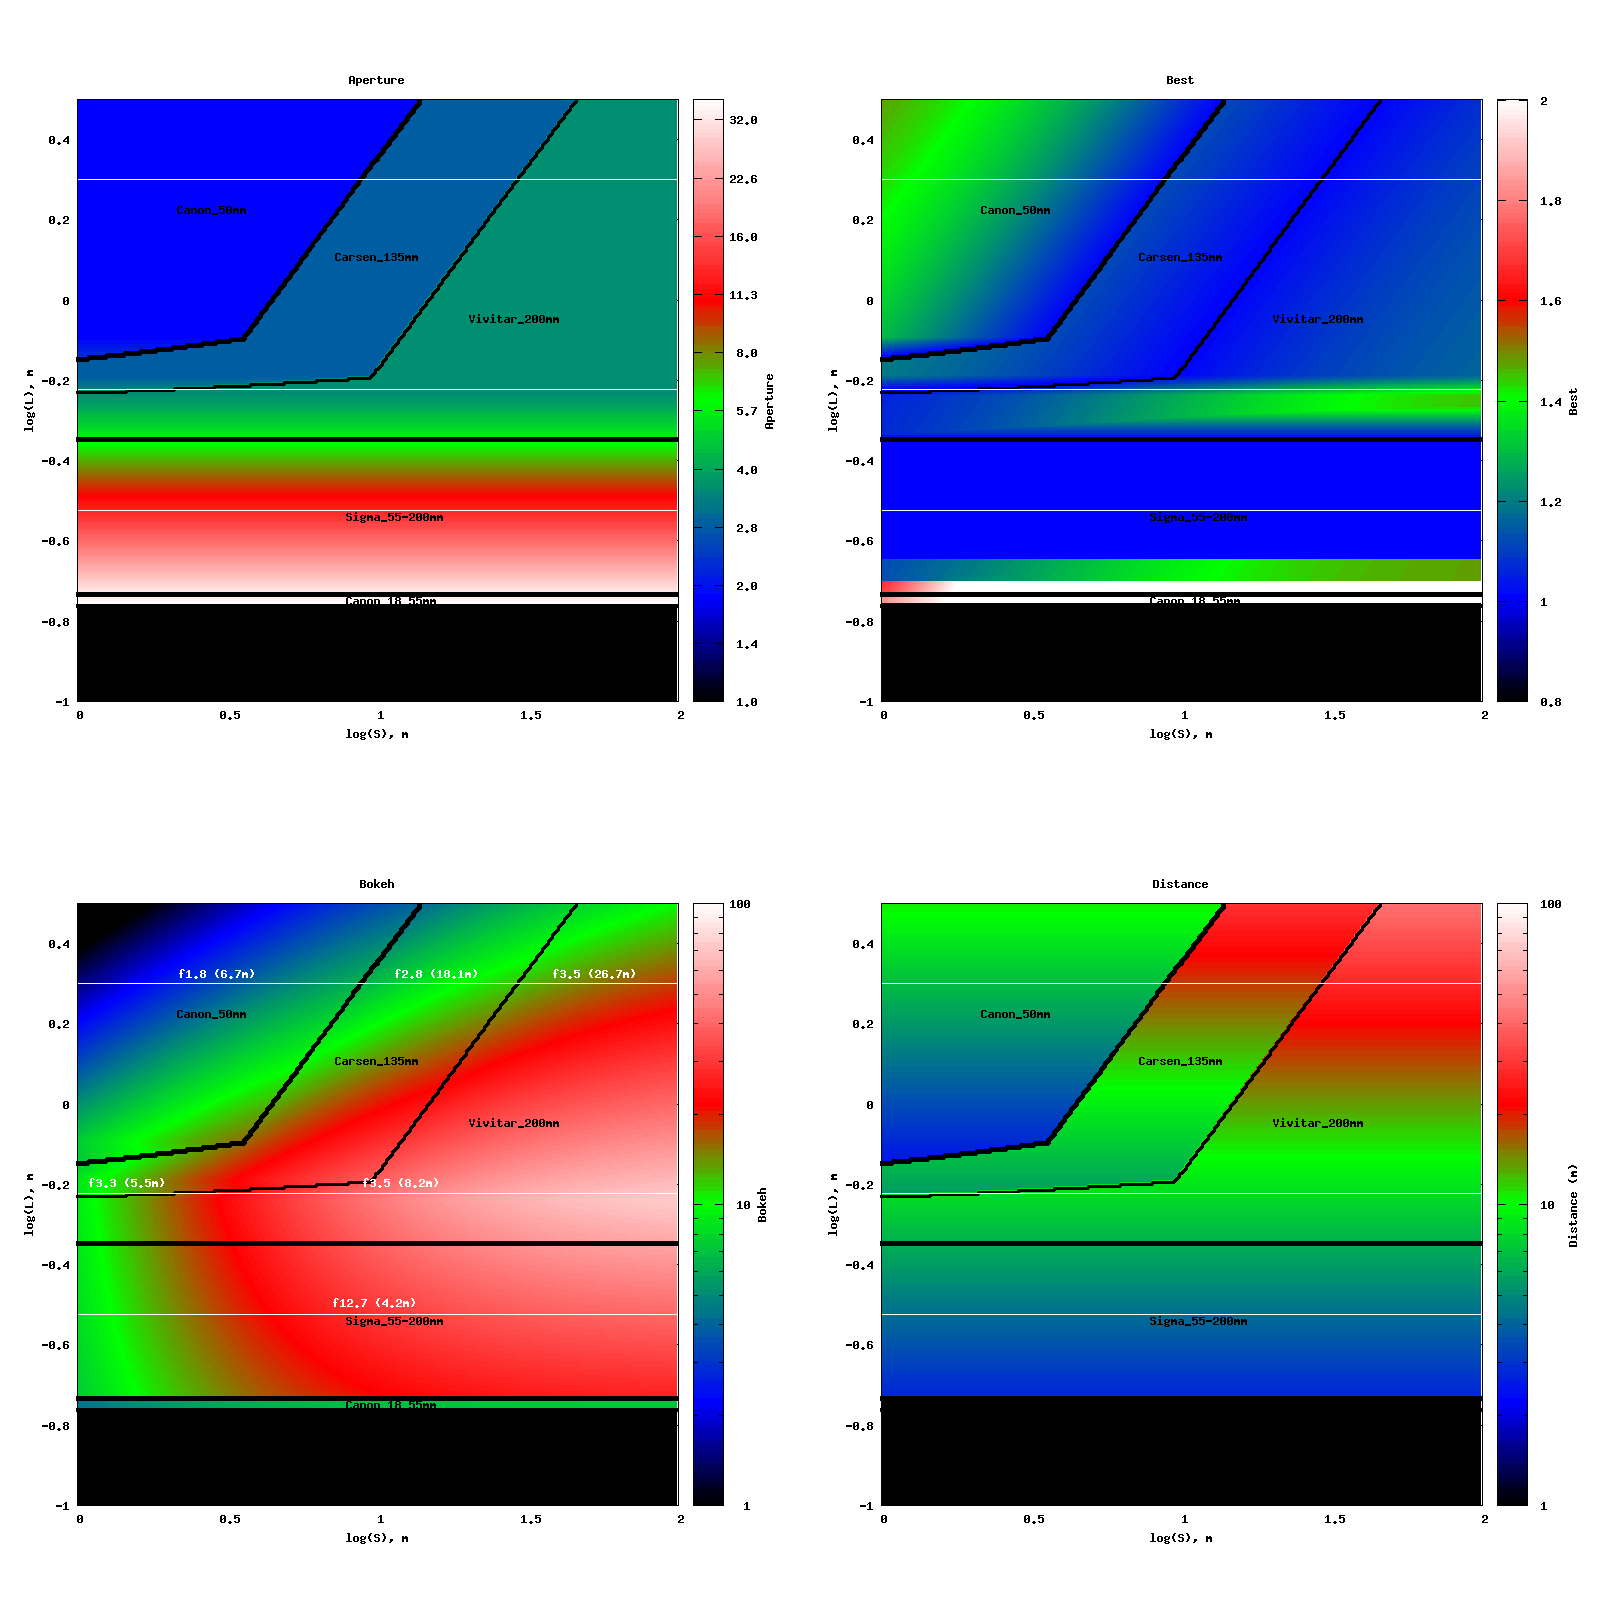
Here is a real life example. Executing the above commands with the collections of lenses I have produces four PNG images: bokeh.png, best.png, dist.png, and apert.png (for convenience, I put all of them together using the ImageMagick command "montage *.png -geometry +2+2 out.png"):
(click on the image to see the full resolution version). The most interesting plot, "Bokeh", is at the left on the bottom. The X-axis is logarithm of the distance from the subject to background, S (meters; the range is 1-100 meters); the Y-axis is the logarithm of the frame height at the subject's distance, L (meters; the range is 0.1-3.2 meters). Thick black contours (with corresponding lens names) mark the areas where this lens is the best (in terms of having the strongest bokeh). The strength of the bokeh is coded in colors (logarithmic scale), with black corresponding to no bokeh (c less than one), and pink - very strong bokeh (c=100). The three white horizontal lines correspond to a head shot (L=0.3m), upper body shot (L=0.6m), and a full-body shot (L=2m), moving from the bottom to the top. The white labels above the white lines show the aperture and the distance of the camera from the subject for the best lens and this value of L (either 0.3, 0.6, or 2m).
As you can see, I don't have a single lens which would produce the best bokeh for all situations (head, upper body, and full body shots). Instead, I have to use 3-4 different lenses depending on circumstances. E.g., for head shots the king is the cheap Sigma 55-200mm lens (at 200mm setting), because of its long focus.
For upper body shots, Vivitar 200mm f/3.5 is the best, though it requires to be rather far from the subject (8.2m), wich is not feasible indoors. For these shots, the lens is great - the bokeh can be up to 100 (for large S). Finally, for full-body shots I need either Canon 50mm f/1.8 if S is up to 10m, Carsen 135mm f/2.8 for S from 10-30m, and Vivitar 200mm f/3.5 if the background is farther than 30m from the subject.
Now, let's estimate if it makes sense to get a more expensive, "portrait" lens - say, 85mm f/1.8. I added one more line for this lens to the lenses.txt file, and redid the above analysis. Let's have a look on only one new image, best.png:
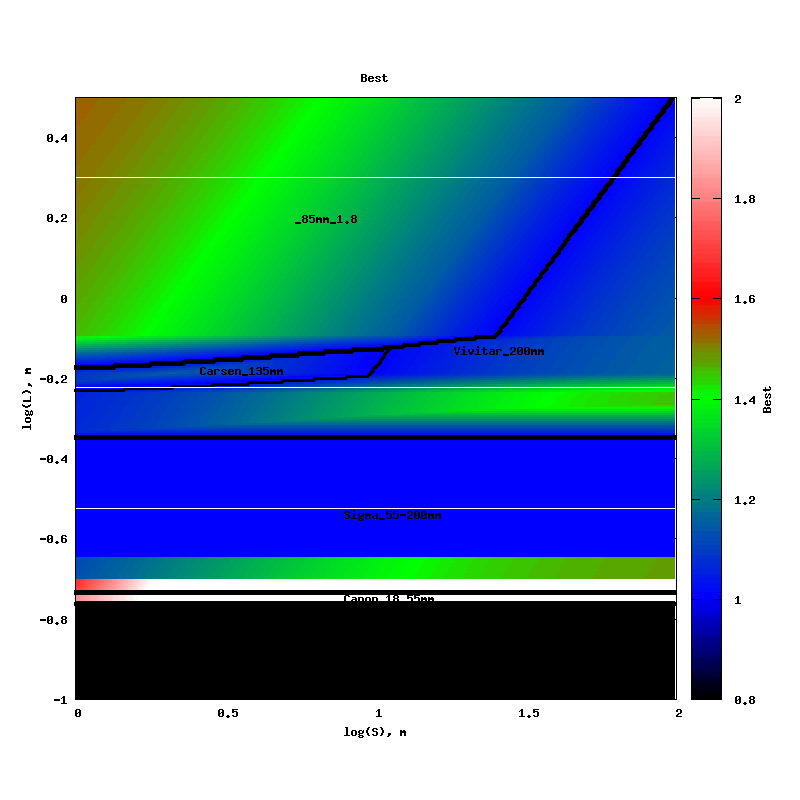
The axes are the same as in "bokeh.png". Color here means a different thing - it tells you "how much stronger is the bokeh for the best lens, compared to the second best lens". In this example, the 85mm f/1.8 lens seems to be the best one for full-body portraits - for S up to 50m (beyond that, my cheap Vivitar 200mm f/3.5 wins over). But what is interesting is that for the range of distances where bokeh is strong (S larger than 10m), the advantage of this expensive lens (compared to the rest of my lenses) is not spectacular - only 30% at best. Is 5 times more expensive lens worth 30% more bokeh only for full body portraits - it is up to you to decide. But probably, not. Of course, being a shorter focal length lens, the 85mm requires much shorter distances from the subject, which can be a big advantage (for normal portraits), or visa verse (if you want a candid photo from a large distance).
The two remaining images, "Aperture" and "Distance", don't require much explanation. The former shows with color the specific values of aperture for the best lens, and the latter shows the distance from the camera to the subject for the best lens. The black area at the bottom of all the images is not achievable (because aperture cannot be made small enough to achieve the required DOF).
A note of caution: "a stronger bokeh" doesn't always mean the best bokeh: size is not everything, and more expensive lenses can potentially produce "more pleasing" bokeh than some cheaper ones. This cannot be computed - you have to test the lens to judge for yourself.
Have fun with your lenses!